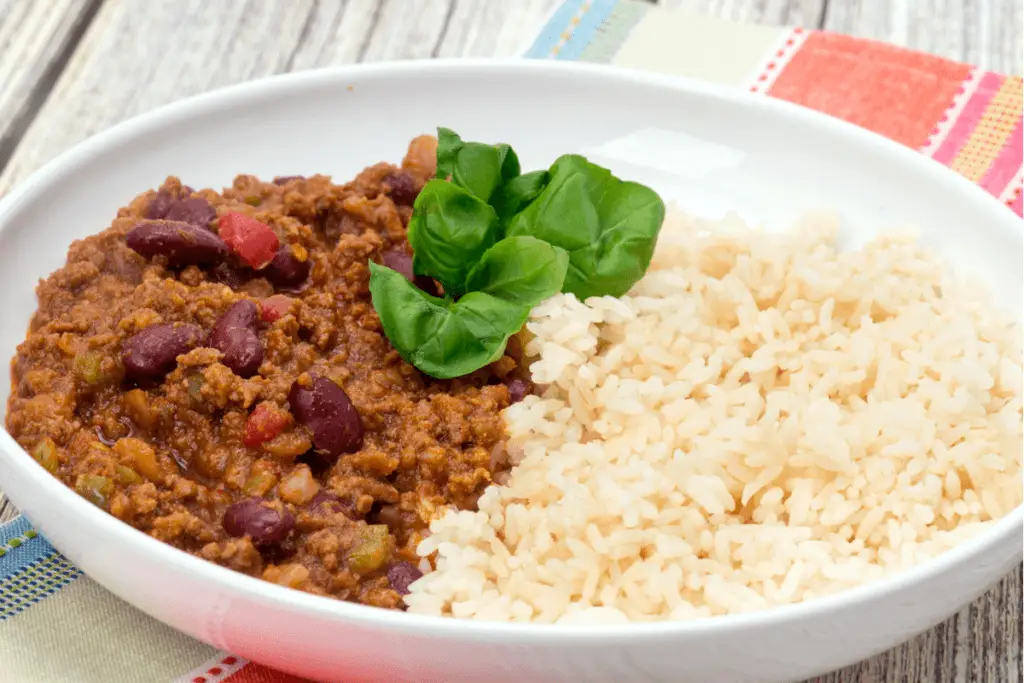
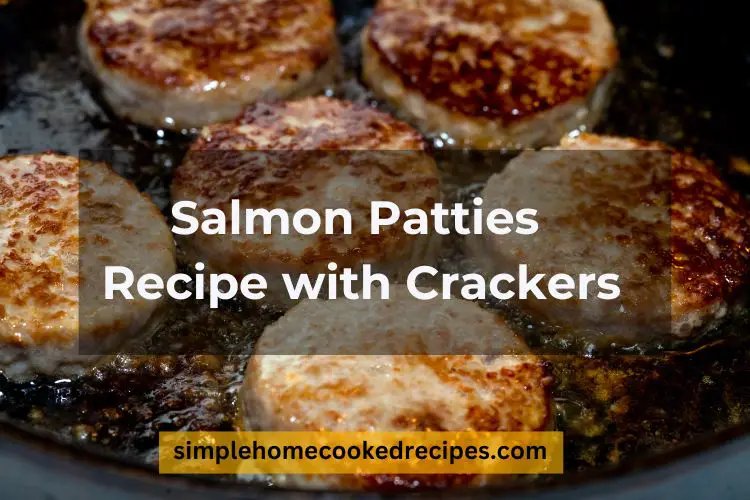
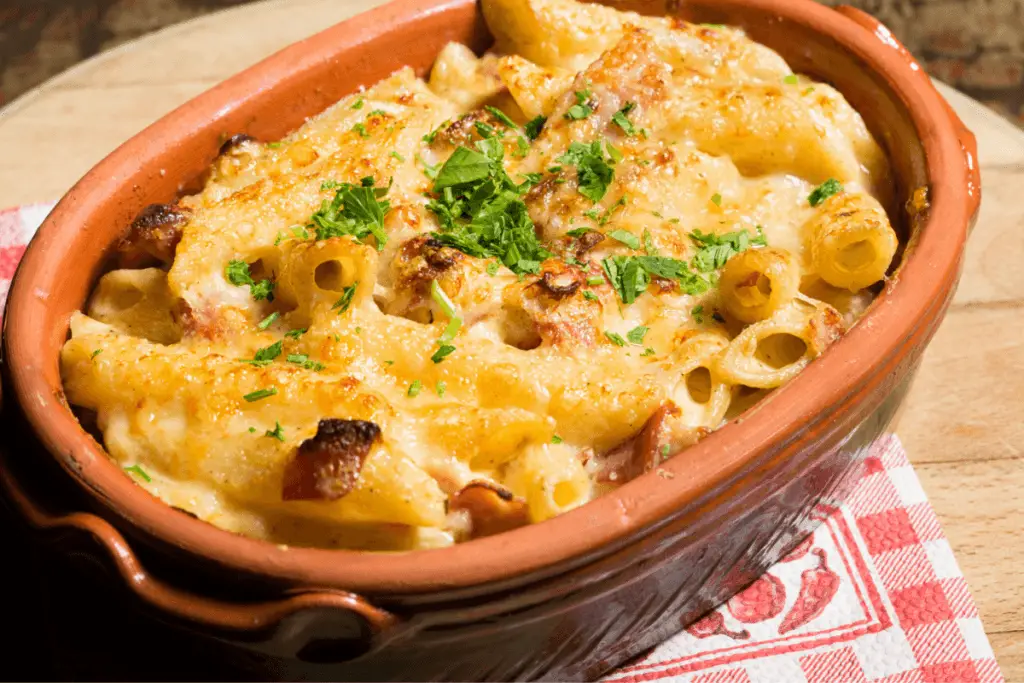
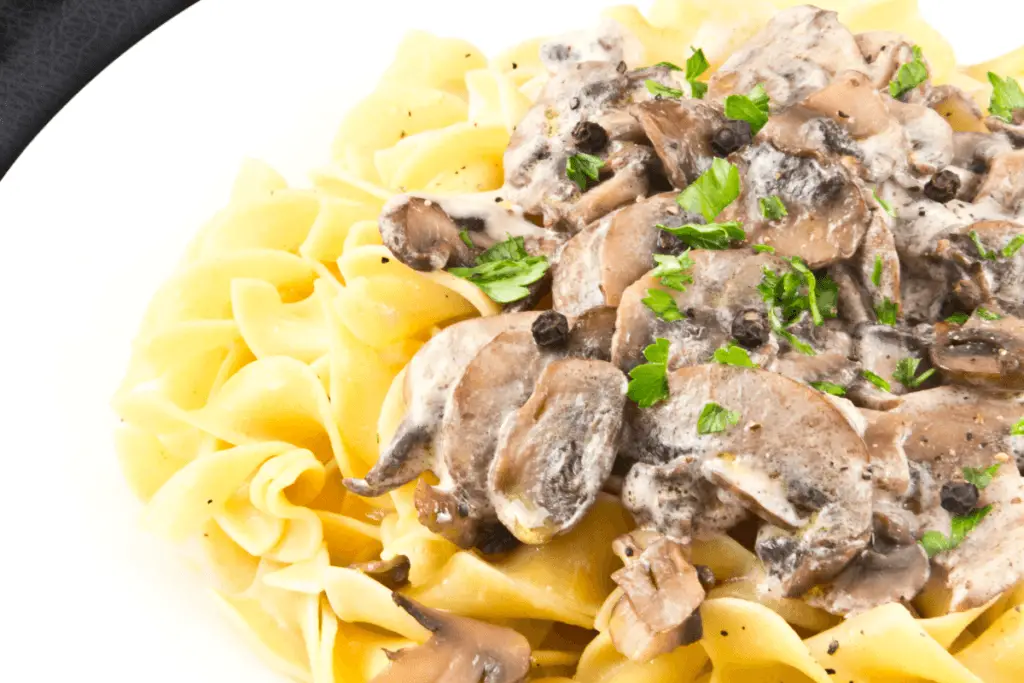
Chilli Con Carne
Chilli Con Carne, with its robust spice blend, tender meat, and hearty beans, is a popular dish that warms the soul. It originated in Mexico and has since crossed borders to become a global comfort food favorite. This recipe is your ticket to a heartwarming, flavor-packed meal, whether it’s game day, a family dinner, or just a cozy evening.
Chilli Con Carne Recipe Overview
This Chilli Con Carne recipe serves 4 hungry people and is ready to delight your taste buds in about 80 minutes. It’s a great option when you want something hearty, delicious, and quick to make. This dish combines ground beef, aromatic spices, beans, and tomatoes in a flavorful and satisfying medley.
Ingredients
- 1 tbsp olive oil
- 1 onion diced
- 2 mixed peppers yellow and green diced
- 500 g beef mince
- 1 tsp chilli powder your choice of strength
- 1 tsp ground cumin
- ½ tsp smoked paprika
- 1 tbsp tomato purée
- 400 g tin chopped tomatoes
- 400 g tin kidney beans drained and washed
- 300 ml beef stock 1 beef stock cube and 300ml hot water
- 1 tsp Worcestershire sauce
Directions
- Heat the oil in a large frying pan, add the onion and peppers and sweat off on a low heat for 5 minutes until the peppers are softened and the onion is translucent.
- Over a medium heat, add the beef mince and mix well breaking it up and browning all over and fry for 5 minutes
- Add the chilli powder, cumin, paprika, tomato puree and mix until well combined. season with salt and pepper and allow to cook out for another 2-3 minutes until fragrant.
- Add the tomatoes, drained and washed kidney beans, stock, and Worcestershire sauce, mix well, and bring to the boil.
- Reduce to a simmer and cook uncovered for 1 hour.
- Keep an eye on the texture, if the mixture is getting too dry, add a drop of water.and stir occasionally, scraping from the bottom to avoid it catching
- You should now have a nice thick smokey chilli
- Serve with rice, a dolop of sour cream and maybe topped with grated cheddar or Monterey Jack cheese.
Also Read: Traditional Cornish Pasty
Nutritional Value (per serving)
- Calories: 400
- Protein: 26g
- Carbohydrates: 28g
- Fat: 20g
- Fiber: 8g
Chilli Con Carne
Course: Main CourseCuisine: MexicanDifficulty: Medium4
servings20
minutes1
hour486
kcal1
hour20
minutesAn easy Chilli Con Carne recipe that is full of flavour. Turn the heat up or down with what ever strength of chilli powder you prefer.
Ingredients
1 tbsp olive oil
1 onion diced
2 mixed peppers yellow and green diced
500 g beef mince
1 tsp chilli powder your choice of strength
1 tsp ground cumin
½ tsp smoked paprika
1 tbsp tomato purée
400 g tin chopped tomatoes
400 g tin kidney beans drained and washed
300 ml beef stock 1 beef stock cube and 300ml hot water
1 tsp Worcestershire sauce
Directions
- Heat the oil in a large frying pan, add the onion and peppers and sweat off on a low heat for 5 minutes until the peppers are softened and the onion is translucent.
- Over a medium heat, add the beef mince and mix well breaking it up and browning all over and fry for 5 minutes
- Add the chilli powder, cumin, paprika, tomato puree and mix until well combined. season with salt and pepper and allow to cook out for another 2-3 minutes until fragrant.
- Add the tomatoes, drained and washed kidney beans, stock and Worcestershire sauce, mix well and bring to the boil.
- Reduce to a simmer and cook uncovered for 1 hour.
- Keep an eye on the texture, if the mixture is getting too dry, add a drop of water.and stir occasionally, scraping from the bottom to avoid it catching
- You should now have a nice thick smokey chilli
- Serve with rice, a dolop of sour cream and maybe topped with grated cheddar or Monterey Jack cheese.
Recipe Video
FAQs
Q: Can I substitute ground turkey for the beef?
Yes, ground turkey can be substituted for a leaner option.
Q: How do I change the spiciness?
For more heat, adjust the chili powder or add a pinch of cayenne pepper.
Q: Can I store leftovers in the freezer?
Chilli Con Carne freezes beautifully. For up to three months, store in an airtight container.
Q: What are some good sides to go with it?
Chilli Con Carne pairs well with cornbread, rice, tortilla chips, or a simple salad.
Q: Is this dish available in a vegetarian version?
Certainly! For a satisfying vegetarian option, replace the beef with plant-based alternatives or add more beans.
Conclusion
Chilli Con Carne is a comfort food champion, offering bold flavors and heartwarming comfort in every bite. Share this dish with family and friends and enjoy the joy it brings to the table.
Crunchy and Flavorful: Salmon Patties Recipe with Crackers
There’s something deeply satisfying about creating homemade salmon patties, especially when they boast a crispy outer layer with a tender and flavorful middle. Using crackers as a binder and added crunch, these salmon patties are easy to whip up and can be the star of any meal. Perfect for dinner parties, family gatherings, or just a weekday treat, they’re sure to delight everyone around your table.
Salmon patties recipe with crackers Overview:
Salmon patties with crackers combine the rich, omega-3-packed goodness of salmon with the crispy texture of crackers. In this recipe, we’ll be crafting delectable salmon patties that can be served with a side of veggies or inside a bun as a salmon burger. The total cooking time is about 30 minutes and this recipe yields approximately 6 servings.
Ingredients:
14.75 oz can of pink salmon, drained and flaked
1 cup of crushed saltine crackers (about 25 crackers)
2 large eggs, beaten
1/2 small onion, finely chopped
1/4 cup chopped fresh parsley (optional)
1/2 teaspoon salt
1/4 teaspoon black pepper
1/2 teaspoon garlic powder
2 tablespoons olive oil for frying
Lemon wedges for serving (optional)
Instructions:
- In a mixing bowl, combine the flaked salmon, crushed crackers, beaten eggs, chopped onion, parsley, salt, black pepper, and garlic powder. Mix well until all ingredients are combined.
- Shape the mixture into patties, about the size of a regular burger patty.
- In a skillet, heat the olive oil over medium heat.
- Once hot, add the salmon patties, ensuring not to overcrowd the pan. Cook for about 4-5 minutes on each side, or until they are golden brown and crispy.
- Remove the patties from the skillet and place them on a plate lined with paper towels to drain any excess oil.
- Serve the salmon patties warm with lemon wedges if desired.
Also Try: Broccoli Crunch Salad Recipe
How to Store and Reheat Salmon Patties?
Storing and reheating salmon patties properly can ensure they remain delicious and safe to consume. Here’s a guide on how to do it:
Storing Salmon Patties:
Cool Before Storing: Allow the salmon patties to cool to room temperature before storing. This prevents them from getting soggy due to steam buildup.
Refrigeration:
Place the salmon patties in a single layer on a plate or tray. Cover them with plastic wrap or aluminum foil. Alternatively, place the patties in an airtight container, separating layers with parchment paper to prevent them from sticking together.
If you can store it this way, salmon patties can last in the refrigerator for up to 2-3 days.
Freezing:
For longer storage, consider freezing the patties. First, place them in a single layer on a baking sheet and freeze until solid (about 1-2 hours). Once frozen, transfer the patties to a zip-top freezer bag or airtight container, separating layers with parchment paper.
Label the bag or container with the date and contents. Properly stored, salmon patties can be frozen for up to 1 month.
Reheating Salmon Patties:
Preheat your oven to 375°F (190°C). Place the patties on a baking sheet and heat for 10-15 minutes, or until heated through. Alternatively, you can warm a non-stick skillet over medium heat. Add the salmon patties and cook for 3-4 minutes on each side, or until heated through and crispy.
Note: Always ensure that the patties reach an internal temperature of 165°F (74°C) before consuming, to ensure they are safe to eat.
Also Try: Potato and Cheese Bake Recipe
Crunchy and Flavorful: Salmon Patties Recipe with Crackers
Course: SidesCuisine: American6
servings15
minutes15
minutes337
kcalIngredients
14.75 oz can of pink salmon, drained and flaked
1 cup of crushed saltine crackers (about 25 crackers)
2 large eggs, beaten
1/2 small onion, finely chopped
1/4 cup chopped fresh parsley (optional)
1/2 teaspoon salt
1/4 teaspoon black pepper
1/2 teaspoon garlic powder
2 tablespoons olive oil for frying
Lemon wedges for serving (optional)
Directions
- In a mixing bowl, combine the flaked salmon, crushed crackers, beaten eggs, chopped onion, parsley, salt, black pepper, and garlic powder. Mix well until all ingredients are combined.
- Shape the mixture into patties, about the size of a regular burger patty.
- In a skillet, heat the olive oil over medium heat.
- Once hot, add the salmon patties, ensuring not to overcrowd the pan. Cook for about 4-5 minutes on each side, or until they are golden brown and crispy.
- Remove the patties from the skillet and place them on a plate lined with paper towels to drain any excess oil.
- Serve the salmon patties warm with lemon wedges if desired.
Nutrition Facts
6 servings per container
- Amount Per ServingCalories337
- % Daily Value *
- Total Fat
13g
17%
- Saturated Fat 3.2g 16%
- Cholesterol 81mg 27%
- Sodium 737mg 33%
- Potassium 101mg 3%
- Total Carbohydrate
30.6g
12%
- Dietary Fiber 1.5g 6%
- Total Sugars 0.7g
- Protein 21.3g 43%
- Calcium 39mg 3%
- Iron 3mg 17%
* The % Daily Value tells you how much a nutrient in a serving of food contributes to a daily diet. 2,000 calories a day is used for general nutrition advice.
FAQs:
Can I use fresh salmon?
Absolutely! If using fresh salmon, you’ll need about 1 pound. Cook it first, let it cool, and then flake it to use in the recipe.
What can I substitute for saltine crackers?
You can use breadcrumbs or even crushed cornflakes as a substitute. Adjust the quantity as needed to achieve the desired consistency.
How can I store leftover salmon patties?
Place any leftover patties in an airtight container and refrigerate. They should be consumed within 2 days for best flavor and texture.
Can these patties be frozen?
Yes, these salmon patties freeze well. Place them individually on a baking sheet to freeze, then transfer to a zip-top bag. They can be stored for up to 2 months. Thaw in the refrigerator before reheating.
Decoding the Shelf Life: How Long is Rotisserie Chicken Good For?
Rotisserie chicken is a very popular meal option around the world. Its captivating smell and juicy flavor frequently keep people coming back for more, whether you’re buying one up from your neighborhood grocery store for a convenient supper alternative or cooking one at home for a weekend feast.
Nevertheless, despite how delicious it is, it also raises a question How long is rotisserie chicken good for? When it comes to perishable foods like chicken, food safety is the top priority. We want to walk you through every step of rotisserie chicken storage, preservation, and spoiling detection in this article. This article will also explain how to preserve the mouthwatering taste of your chicken while making sure it’s safe to eat.
History of Rotisserie Chicken
Rotisserie cooking has ancient roots. It goes back to medieval times. Back then, people turned meat slowly over a fire. They used their hands or a simple crank. This method ensured the meat was evenly cooked and remained juicy.
The love for rotisserie chicken first blossomed in France. There, it got the name “poulet rôti.” The French adored its simple, juicy taste.
By the time the 20th century rolled around, technology had advanced. Electric rotisseries came into the picture. This made the cooking process even more straightforward.
In the 1990s, a trend started in the U.S. Supermarkets began selling pre-cooked rotisserie chickens. They often priced them low to lure in customers. Now, these tasty birds are a staple worldwide, praised for both their flavor and convenience.
The Importance of Proper Food Storage

Maintaining the quality, taste, and safety of our meals depends on proper food storage. It contributes to the preservation of food’s freshness, increases its shelf life, and protects against foodborne infections.
Rotisserie chicken is one perishable that is particularly prone to bacterial development when not stored properly.
Poultry frequently contains bacteria like Salmonella and Campylobacter, which can multiply quickly at room temperature and raise the possibility of food poisoning. It is crucial to use proper food storage procedures because the signs of foodborne infections can range from minor discomfort to serious problems needing hospitalization.
Immediate refrigeration is essential when it comes to preserving rotisserie chicken. Chicken should be stored in the refrigerator within two hours of cooking or purchasing. Additionally, keeping your refrigerator’s temperature below 40°F (4°C) helps prevent the formation of bacteria and keeps your chicken safe for consumption for a longer amount of time.
The use of the appropriate containers is another aspect of proper food storage. Cross-contamination can be avoided while maintaining the flavor and quality of your chicken using airtight containers or strong freezer bags. Being aware of and using safe food storage practices benefits both our health and the quality of our overall dining experience. We can take full use of meals like rotisserie chicken by maintaining their flavor and quality.
How Long Rotisserie Chicken Can Last in the Fridge

To guarantee that rotisserie chicken is safe and of high quality for eating, it is essential to understand how long it will remain fresh. A rotisserie chicken is best eaten immediately while it’s still hot from the oven. This is the time when the texture and flavor are at their best. Try to eat a warm rotisserie chicken you bought from the grocery store within two hours.
The refrigerator is the next best place for storing your rotisserie chicken if you can’t eat it immediately. Cooked chicken can be stored in the fridge for 3–4 days. Although it may start to dry out a little at the end of this time, it should retain most of its flavor and texture over this time. To keep it fresh and avoid contamination, you should always store it in an airtight container.
However, it’s important to keep in mind that while freezing can maintain the chicken’s safety, it could somewhat change its texture and flavor, especially if kept for a long time. The freshness of your rotisserie chicken may also depend on other factors, such as the temperature of your refrigerator or freezer and how the chicken has been handled before storage. Keep in mind that these time frames are only guidelines. You must be cautious and eliminate any chicken that smells bad, looks discolored, or feels sticky.
Also Read: How Long to Cook Thin Chicken Breast in Oven at 400
Signs that Rotisserie Chicken Has Gone Bad
To prevent potential foodborne infections, it is essential to recognize rotten chicken. Changes in scent, color, and texture are typically indicators that a rotisserie chicken has gone bad.
Chicken that has gone bad usually smells bad first. The aroma of fresh chicken is subtle or light. Your chicken is probably destroyed if it has an unpleasant odor that is frequently described as “sour,” “rotten,” or “ammonia-like.” Never overlook an unpleasant or off-smelling smell because it usually indicates bacterial growth.
Potential Risks of Consuming Spoiled Chicken
Foodborne infections or food poisoning, can cause major problems with your health if you consume rotten chicken. Different microorganisms that flourish on improperly stored chicken are the root of many diseases.
Salmonella and Campylobacter are two of the most typical bacteria discovered in rotten chicken. Both of them can cause severe gastroenteritis symptoms like diarrhea, abdominal cramps, fever, nausea, and vomiting. In severe situations, these symptoms might cause dehydration and necessitate hospitalization. They can persist anywhere from a few hours to several days.
Infected chicken can also include dangerous microorganisms like Clostridium perfringens and Staphylococcus aureus, which can cause similar debilitating symptoms. In rare cases, eating rotten chicken can lead to more severe illnesses, like kidney failure-causing Hemolytic Uremic Syndrome. Proper food handling, storage, and monitoring for rotting symptoms are the greatest means of protection against these possible threats.
Tips for Extending the Shelf Life of Rotisserie Chicken
Rotisserie chicken’s flavor and freshness can be preserved for a longer period of time with proper storage methods and some additional tips. Let’s check out some essential tips to keep the freshness and flavor of the chicken.
Immediate Refrigeration
You should put your rotisserie chicken in the refrigerator as soon as possible. It is one of the crucial steps in extending its shelf life. To prevent bacterial growth, it is recommended to store the chicken in the refrigerator within two hours of cooking or purchasing.
Proper Packaging
It matters how you store your chicken and how it is packaged. The chicken should be kept in sealed containers or strong freezer bags. These shield your food from contamination from other foods in your refrigerator or freezer as well as exposure to air, which can cause your chicken to dry out.

Divide into Portions
Consider cutting up a large chicken into smaller chunks before freezing or refrigerating it if it won’t be eaten all at once. In this way, you may simply remove the quantity you require without defrosting the whole chicken.
Freezing for Longer Storage
Freezing your rotisserie chicken is a fantastic choice for longer storage. Rotisserie chicken can be stored in the freezer for up to four months if it is properly packed and sealed.
Reheating Properly
Make sure the chicken is properly warmed before serving. To eliminate any potential microorganisms, heat it up to an internal temperature of 165°F (74°C).
FAQs
Can you eat rotisserie chicken after 5 days in the fridge?
Although rotisserie chicken may possibly be eaten after five days in the refrigerator, it’s usually safest to eat it within three to four days. Quality, flavor, and safety can begin to decline after five days. Always check for degradation using your senses. It is preferable to throw away chicken if it smells bad, has changed color, or has a slimy texture in order to prevent foodborne infections.
Can you freeze rotisserie chicken immediately?
Rotisserie chicken can be frozen right away after purchase to increase shelf life. However, it’s recommended to let the chicken cool down first for maximum safety and to avoid raising the temperature in your freezer. When it has cooled, wrap it tightly in materials that can withstand freezing or put it in airtight containers. Then, store it in the freezer where it may be kept for a while.
How do you properly reheat rotisserie chicken?
You can use an oven to properly reheat rotisserie chicken. Place the chicken in a baking dish and preheat the oven to 350 degrees. You can add a small bit of water or chicken stock to keep it moist. Heat the casserole for roughly 20 to 30 minutes, or until the chicken is well-heated. By using this technique, the chicken’s flavor is preserved and it doesn’t dry out.
Can I use the bones of the rotisserie chicken?
Yes, you may make homemade chicken stock or bone broth using rotisserie chicken bones. Simply add the bones to a saucepan along with water, some of your favorite herbs, and some veggies like onions, carrots, and celery. Then, drain it after letting it simmer for a few hours. The stock or broth can be saved for later use or stored in the freezer for several months. It may also be eaten immediately.
Is it safe to eat cold rotisserie chicken?
Yes, if the rotisserie chicken has been properly stored and chilled, then eating it cold is safe. In order to stop the growth of bacteria, the chicken should be refrigerated within two hours of cooking or purchasing it. Cold rotisserie chicken is commonly eaten in salads, sandwiches, and even straight from the refrigerator. Always look for indicators of deterioration, such as odd scents, colors, or textures, before eating.
In a Nutshell
Understanding the rotisserie chicken’s shelf life and taking the required precautions to store it properly will substantially improve your dining experiences while protecting you from any foodborne illnesses. By using the information provided in this article, you can plan your meals more effectively and waste less food while still maintaining the great flavor of your chicken.
You should be familiar with the ideal methods for keeping and reheating your rotisserie chicken, as well as the warning indications of deterioration. You should always maintain caution when it comes to food safety. Any chicken that might have gone rotten should be thrown away. Rotisserie chicken’s tasty flavor and adaptability are the major two factors that contribute to its popularity. To make sure that every taste is as delicious and secure as the last, you must know how to handle it safely.
Macaroni Cheese and Bacon
Few dishes can compete with the irresistible allure of Macaroni Cheese and Bacon when it comes to classic comfort food. The idea of tender macaroni encased in a velvety cheese sauce, punctuated by the smoky, crispy goodness of bacon, is enough to make anyone’s taste buds dance.
Overview of Macaroni Cheese and Bacon Recipe
This decadent dish combines the creaminess of cheese with the salty, savory kick of bacon, all while being cradled by perfectly cooked macaroni. The end result? A symphonic blend of flavors and textures that will leave you wanting more.
Ingredients
- 100 g butter plus extra for greasing
- 100 g plain flour
- 1 tsp Dijon mustard
- 1.2 litres full-fat milk
- 75 ml double cream
- 1 bay leaf
- 400 g mature cheddar grated
- pinch freshly grated nutmeg
- 500 g dried macaroni
- 100 g smoked bacon lardons
- 60 g white breadcrumbs
- 50 g Parmesan grated
- salt and freshly ground black pepper
Directions
Preheat the oven to 200°C/180°C Fan/400°F/Gas 6
- Butter a large ovenproof dish.
To Make the Creamy Cheese Sauce
- Make a roux by melting the butter in a large saucepan over a low heat and then stir in the flour and cook for 1 minute stirring continuously. Stir in the mustard
- take the pan off the heat and warm the milk in a separate pan.
- Return the roux to a low heat and very gradually add the warmed milk a little at a time whisking constantly (We need to avoid the sauce going lumpy)
- Once all the milk has been incorporated whisk in the cream and add the bay leaf.
- Allow the sauce to come to a gentle simmer and keep stirring until it thickens.
- Remove the pan from the heat, remove the bay leaf and add the grated cheddar.
- Stir until the cheese has melted. Season with black pepper and a fair size pinch of nutmeg.
Preparing the Pasta
- Bring a large pan of salted water to the boil and drop in the macaroni, give the pasta a stir and allow to cookout for 10 minutes, or until al dente (cooked but firm to the bite)
- Drain the Macaroni and add to the sauce.
Bringing the Dish Together
- Fry the bacon in a frying pan until crisp, then add to the macaroni cheese. give it a stir to incorporate the bacon and pour the mixture into the ovenproof dish.
- Mix the breadcrumbs with the grated Parmesan and scatter over the top.
- Bake for 25–30 minutes, or until golden-brown and bubbling.
- Serve and enjoy
Garnishing and Serving
Sprinkle chopped parsley or chives on top for a picture-perfect presentation. Feel free to experiment with different toppings, such as breadcrumbs or diced tomatoes.
Also Read: Mary Berry’s Bolognese Bake
Why Macaroni and Cheese is Awesome
The synergy of its ingredients is what makes this dish truly unique. Each macaroni piece is coated in a creamy cheese sauce, while the bacon adds a delightful crunch and a savory punch. It’s a culinary work of art!
Nutritional Value (or its absence)
Let’s be honest: this dish isn’t about calorie counting. It’s all about luxury and comfort. Consume it in moderation and savor every delectable bite.
Macaroni Cheese and Bacon
Course: Main CourseCuisine: ItalianDifficulty: Medium6
servings20
minutes45
minutes921
kcal1
hour5
minutesMacaroni in a creamy cheese sauce with added crispy bacon baked in the oven with a crunchy cheesy topping.
Ingredients
100 g butter plus extra for greasing
100 g plain flour
1 tsp Dijon mustard
1.2 litres full-fat milk
75 ml double cream
1 bay leaf
400 g mature cheddar grated
pinch freshly grated nutmeg
500 g dried macaroni
100 g smoked bacon lardons
60 g white breadcrumbs
50 g Parmesan grated
salt and freshly ground black pepper
Directions
- Preheat the oven to 200°C/180°C Fan/400°F/Gas 6
- Butter a large ovenproof dish..
- To Make the Creamy Cheese Sauce
- Make a roux by melting the butter in a large saucepan over a low heat and then stir in the flour and cook for 1 minute stirring continuously. Stir in the mustard
- take the pan off the heat and warm the milk in a separate pan.
- Return the roux to a low heat and very gradually add the warmed milk a little at a time whisking constantly (We need to avoid the sauce going lumpy)
- Once all the milk has been incorporated whisk in the cream and add the bay leaf.
- Allow the sauce to come to a gentle simmer and keep stirring until it thickens.
- Remove the pan from the heat, remove the bay leaf and add the grated cheddar.
- Stir until the cheese has melted. Season with black pepper and a fair size pinch of nutmeg.
- Preparing the Pasta
- Bring a large pan of salted water to the boil and drop in the macaroni, give the pasta a stir and allow to cookout for 10 minutes, or until al dente (cooked but firm to the bite)
- Drain the Macaroni and add to the sauce.
- Bringing the Dish Together
- Fry the bacon in a frying pan until crisp, then add to the macaroni cheese. give it a stir to incorporate the bacon and pour the mixture into the ovenproof dish.
- Mix the breadcrumbs with the grated Parmesan and scatter over the top.
- Bake for 25–30 minutes, or until golden-brown and bubbling.
- Serve and enjoy
FAQs
Q: Can I substitute turkey bacon for regular bacon?
Turkey bacon is a leaner alternative that works well in this recipe.
Q: Which kind of cheese is best for this recipe?
A classic combination of cheddar and mozzarella is recommended, but feel free to experiment with your own favorites.
Q: How do I reheat leftovers without losing their creamy texture?
Add a splash of milk and gently reheat on the stovetop, stirring frequently.
Q: Is it possible to prepare this dish ahead of time for a party?
Absolutely! Make it ahead of time and bake it just before serving for a piping hot, cheesy delight.
Q: What sides go well with mac and cheese with bacon?
This hearty dish pairs well with a fresh green salad, garlic bread, or steamed vegetables.
Conclusion
Macaroni Cheese and Bacon is a flavor and satisfaction champion in the world of comfort food. Whether you’re cooking for loved ones or looking for solace in a bowl, this recipe delivers.
This recipe is inspired from Rick Steins Road to Mexico TV series Episode 1 and his best selling book about his journey.
Mushroom Stroganoff
Look no further than our Mushroom Stroganoff recipe for a delectable vegetarian dish that oozes comfort and flavor. It’s a delightful twist on the classic Beef Stroganoff that will tantalize your taste buds, with earthy mushrooms, a rich creamy sauce, and a touch of aromatic spices.
Overview of Mushroom Stroganoff Recipe
In this article, we’ll walk you through the entire process of making this delectable Mushroom Stroganoff. Everything you need to make a restaurant-quality meal at home is included, from carefully selected ingredients to step-by-step cooking instructions and serving suggestions.
Ingredients
- 1 tbsp olive oil
- 300 g mushrooms chestnut or button or your choice
- 2 shallots chopped
- 1 red pepper chopped
- 2 cloves garlic crushed
- 250 ml vegetable stock
- 2 tsp smoked paprika
- fresh thyme chopped
- 110 g basmati rice
- 200 ml soya single cream
- Ground black pepper to taste
Directions
- Heat the olive oil in a large deep frying pan and add the shallots and red pepper.
- Cook down until they are tender
- Add the garlic and cook out for a further minute or so
- Add the mushrooms paprika and thyme and cook until the mushrooms soften and most of the liquid has disappeared.
- Add the vegetable stock
- Cook for 7 minutes, uncovered until about half of the liquid has reduced.
- Whilst the stroganoff is cooking, begin to cook the rice according to packet instructions.
- Add the cream and a generous amount of pepper to the stroganoff, then simmer for approximately 5 minutes, stirring frequently.
- Once cooked, spoon the rice onto plates and spoon the stroganoff on top.
- Enjoy with garlic bread (use gluten/wheat-free bread if required)
Flavor Enhancement Techniques
The versatility of this recipe is one of its highlights. Experiment with various types of mushrooms to find your preferred flavor profile. Do you want it hotter? Add a pinch of cayenne pepper to taste. Create a masterpiece on your canvas, which is the kitchen.
Also Read: Chicken Breast in Creamy Mushroom Sauce
Mushroom Health Benefits
Mushrooms not only add flavor but also contribute to a well-balanced diet. They are low in calories, high in nutrients, and antioxidant-rich. So, indulging in Mushroom Stroganoff isn’t just a tasty treat; it’s also a healthy choice.
Mushroom Stroganoff
Course: Main CourseCuisine: RussianDifficulty: Medium4
servings10
minutes20
minutes391
kcal30
minutesCreamy vegetarian mushroom stroganoff served with wild rice A superb mushroom dish and dairy free
Ingredients
1 tbsp olive oil
300 g mushrooms chestnut or button or your choice
2 shallots chopped
1 red pepper chopped
2 cloves garlic crushed
250 ml vegetable stock
2 tsp smoked paprika
fresh thyme chopped
110 g basmati rice
200 ml soya single cream
Ground black pepper to taste
Directions
- Heat the olive oil in a large deep frying pan and add the shallots and red pepper.
- Cook down until they are tender
- Add the garlic and cook out for a further minute or so
- Add the mushrooms paprika and thyme and cook until the mushrooms soften and most of the liquid has disappeared.
- Add the vegetable stock
- Cook for 7 minutes, uncovered until about half of the liquid has reduced.
- Whilst the stroganoff is cooking, begin to cook the rice according to packet instructions.
- Add the cream and a generous amount of pepper to the stroganoff, then simmer for approximately 5 minutes, stirring frequently.
- Once cooked, spoon out the rice onto plates and spoon the stroganoff on top.
- Enjoy with garlic bread (use gluten/wheat free bread if required)
Recipe Video
Conclusion
Mushroom Stroganoff is the undisputed king of vegetarian comfort food. Its velvety sauce, earthy mushrooms, and aromatic seasonings combine to create a flavor symphony that will keep you coming back for more. So roll up your sleeves, gather your ingredients, and prepare to embark on a culinary adventure that promises satisfaction with every bite.
FAQs
Q: Can I use a variety of mushrooms?
Absolutely! Experiment with different mushroom varieties to find your favorite combination.
Q: Is a vegan version of this recipe available?
Yes, you can make a vegan version by replacing the sour cream with a dairy-free alternative.
Q: Is it possible to freeze Mushroom Stroganoff?
While it is best eaten fresh, it can be frozen; however, the texture may change slightly upon thawing.
Q: What’s the best pasta to pair it with?
Egg noodles are a traditional choice, but any pasta will do.
Q: How much time does it take to make this dish?
Mushroom Stroganoff is ready in about 30 minutes, making it ideal for busy weeknight dinners.
Lancashire Hotpot Recipe
The Lancashire Hotpot is a dish that is as comforting as a warm embrace in the heart of England. This traditional British dish has graced dinner tables for generations, providing a hearty taste of tradition and simplicity. If you’re up for a culinary adventure, here’s a step-by-step guide to making your own delicious Lancashire Hotpot.
Overview of Lancashire Hotpot Recipe
The Lancashire Hotpot is a time-honored British dish known for its layers of tender lamb, sliced potatoes, and caramelized onions that have been gently simmered to perfection. This article will walk you through the ingredients, the cooking process, the historical roots of this delectable dish, serving suggestions, and some expert tips for mastering it.
Ingredients
- 100 g Butter
- 900 g Stewing lamb cut into large chunks
- 3 Lamb’s kidneys sliced, fat removed
**(See video for preparing Kidneys)** - 2 White onions chopped
- 4 Carrots peeled and sliced
- 25 g Plain flour
- 2 tsp Worcestershire sauce
- 500 ml Lamb Stock
- 2 bay leaves
- 900 g Maris Piper potatoes peeled and sliced
- 1 sprig Thyme remove the leaves from the stalks
Directions
Preheat the oven to 170C/325F/Gas Mark 3
- Melt the butter in a medium-sized saucepan and sear the lamb and the Lamb Kidneys until lightly browned all over (about 3-4 minutes). Do this in batches rather than having too much meat in the pan.
- Set the meat aside on a plate, then add the onions to the pan and cook for 3-4 minutes, stirring regularly, until soft and translucent.
- Place the meat back in the pan with the onions and add the flour, combine the flour well with the meat and onions letting them cookout for about a minute, keep it agitated to stop it catching on the bottom of the pan.
- Gradually add in the stock, stirring constantly, and add the bay leaves, salt, pepper and Worcestershire sauce.
- When everything is combined, bring to a gentle simmer for 4/5 minutes.
- Then carefully ladle the contents into a casserole dish with a lid and place in the oven for 30 minutes.
- After 30 minutes, mix in the carrots and arrange the sliced potatoes overlapping starting from the outside and working towards the centre.
- Brush the top of the potatoes with melted butter and sprinkle on the thyme leaves.
- Cover with the lid and place back in the oven for 1 hour.
- After an hour, remove the lid from the casserole and turn the oven up to 200c/400f.
- Let the hotpot cook out for another 30 minutes until the potatoes are golden brown and crisp on top.
- Remove the oven, and serve.
A Flavor of British Tradition
The Lancashire Hotpot is more than just a dish; it’s a trip back in time. It was originally a favorite among industrial workers because it was a quick and filling meal that kept them going through long days. Its long-lasting popularity reflects its exceptional taste and simplicity.
Also Read: Traditional Shepherds Pie Recipe
Suggestions for Serving and Pairings
Serve your Lancashire Hotpot with pickled red cabbage or garden peas as a side. This dish pairs well with a glass of traditional British ale or a refreshing apple cider. To finish your meal in true British style, indulge in a classic British pudding.
Lancashire Hotpot
Course: British, Classic Dishes, Main CourseCuisine: BritishDifficulty: Medium4
servings30
minutes1
hour30
minutes698
kcal2
hoursA diced Lamb and lamb kidney dish with carrots and onions topped with sliced potatoes that are soft on the underside but crisp and golden brown on the top
Ingredients
100 g Butter
900 g Stewing lamb cut into large chunks
3 Lamb’s kidneys sliced, fat removed
**(See video for preparing Kidneys)**2 White onions chopped
4 Carrots peeled and sliced
25 g Plain flour
2 tsp Worcestershire sauce
500 ml Lamb Stock
2 bay leaves
900 g Maris Piper potatoes peeled and sliced
1 sprig Thyme remove the leaves from the stalks
Directions
- Preheat the oven to 170C/325F/Gas Mark 3
- Melt the butter in a medium-sized saucepan and sear the lamb and the Lamb Kidneys until lightly browned all over (about 3-4 minutes). Do this in batches rather than having too much meat in the pan.
- Set the meat aside on a plate, then add the onions to the pan and cook for 3-4 minutes, stirring regularly, until soft and translucent.
- Place the meat back in the pan with the onions and add the flour, combine the flour well with the meat and onions letting them cookout for about a minute, keep it agitated to stop it catching on the bottom of the pan.
- Gradually add in the stock, stirring constantly, and add the bay leaves, salt, pepper and Worcestershire sauce.
- When everything is combined, bring to a gentle simmer for 4/5 minutes.
- Then carefully ladle the contents into a casserole dish with a lid and place in the oven for 30 minutes.
- After 30 minutes, mix in the carrots and arrange the sliced potatoes overlapping starting from the outside and working towards the centre.
- Brush the top of the potatoes with melted butter and sprinkle on the thyme leaves.
- Cover with the lid and place back in the oven for 1 hour.
- After an hour, remove the lid from the casserole and turn the oven up to 200c/400f.
- Let the hotpot cook out for another 30 minutes until the potatoes are golden brown and crisp on top.
- Remove the oven, and serve.
Recipe Video
Conclusion
You’re not just eating a meal when you savor the rich flavors and heartiness of the Lancashire Hotpot; you’re experiencing a piece of British history. This humble dish continues to warm people’s hearts and satisfy their appetites all over the world.
FAQs
Q: Can I substitute beef for lamb?
Yes, you can substitute beef for lamb if you prefer. It will still taste great.
Q: Which potato variety is best for this dish?
Because of their starchy texture, Russet or Yukon Gold potatoes work well.
Q: Is it possible to make a vegetarian Lancashire Hotpot?
To make a hearty vegetarian version, replace the meat with mushrooms or vegetable stock.
Q: How long can I keep leftovers in the fridge?
Leftovers can be stored in the refrigerator for up to three days or frozen for several months.
Q: What is the meaning of the term “hotpot”?
The name is most likely derived from the fact that all of the ingredients are cooked in one pot, simplifying the cooking process.
Mary Berry Gingerbread Recipe
The tantalizing aroma of gingerbread wafting from the oven, the soft, slightly spiced texture melting in your mouth – homemade gingerbread is difficult to resist. And when it’s a recipe created by Mary Berry, the queen of baking herself, you know you’re in for a treat.
Overview of Mary Berry Gingerbread Recipe
Mary Berry’s Gingerbread recipe exemplifies simple yet delectable baking. It’s a warm, comforting treat that embodies the essence of togetherness and warmth. In this article, we’ll go over the specifics of this time-honored recipe and discover why it’s so special.
Ingredients
- 225 g self-raising flour
- 1 tsp bicarbonate of soda
- 2 tbsp ground ginger
- 1 tsp mixed spice
- 100 g butter, diced
- 100 g black treacle
- 100 gl golden syrup
- 100 g light muscovado sugar
- 1 egg beaten
- 275 ml full-fat milk
Directions
- Preheat the oven to 180°C/160°C fan/350°F/Gas 4.
- lightly butter and line a 9″x12″ deep baking tray with baking paper.
- Sieve the flour, bicarbonate, ginger and mixed spice into a large bowl.
- Place the butter, treacle, syrup and sugar into a small saucepan and heat gently until the butter has just melted.
- Set aside to cool a little.
- Once cooled, make a well in the middle of the dry ingredients and pour the butter mixture into the bowl add the beaten egg, a splash of milk and beat with a wooden spoon until totally combined.
- Gradually add the remainder of the milk, beating to make a smooth batter.
- Pour the batter into the prepared tin and bake for about 35 minutes or until dark golden and springy to the touch.
- Test with a thin skewer by inserting through the top, if it comes out clean your bake is cooked
- Leave to cool for a few minutes before cutting into 24 pieces in the tin
- Serve on its own or with Creme Anglaise or Vanilla ice cream for a dessert
Why Choose Mary Berry’s Gingerbread
Mary Berry’s recipes are famous for a reason. Her expert touch and tradition infuse each bite with nostalgic and love. This gingerbread is no exception, creating nostalgia while remaining timeless.
Serving Suggestions
For an indulgent treat, serve gingerbread with a dollop of clotted cream or vanilla ice cream. A steaming cup of tea or coffee perfectly complements the sweetness, making it an excellent choice for afternoon tea or dessert.
Also Try:
Stocks Pound Cake Recipe: A Bake From The Heart
Mary Berry’s Marmalade Cake: A Deliciously Zesty Delight!
Mary Berry Gingerbread Recipe
Course: dessertCuisine: BritishDifficulty: Easy24
servings15
minutes35
minutes116
kcal50
minutesAnother beautiful recipe from the queen of baking Mary Berry, with her sticky but so light and full of flavour Gingerbread Mary featured this recipe in her BBC2 program Simple Comforts and features in her Simple Comforts Cook Book (See Notes)
What You Will Need
23 x 30cm tray bake
Ingredients
225 g self-raising flour
1 tsp bicarbonate of soda
2 tbsp ground ginger
1 tsp mixed spice
100 g butter, diced
100 g black treacle
100 gl golden syrup
100 g light muscovado sugar
1 egg beaten
275 ml full-fat milk
Directions
- Preheat the oven to 180°C/160°C fan/350°F/Gas 4.
- lightly butter and line a 9″x12″ deep baking tray with baking paper.
- Sieve the flour, bicarbonate, ginger and mixed spice into a large bowl.
- Place the butter, treacle, syrup and sugar into a small saucepan and heat gently until the butter has just melted.
- Set aside to cool a little.
- Once cooled, make a well in the middle of the dry ingredients and pour the butter mixture into the bowl add the beaten egg, a splash of milk and beat with a wooden spoon until totally combined.
- Gradually add the remainder of the milk, beating to make a smooth batter.
- Pour the batter into the prepared tin and bake for about 35 minutes or until dark golden and springy to the touch.
- Test with a thin skewer by inserting through the top, if it comes out clean your bake is cooked
- Leave to cool for a few minutes before cutting into 24 pieces in the tin
- Serve on its own or with Creme Anglaise or Vanilla ice cream for a dessert
Recipe Video
Notes
- Adapted From Mary Berry “Simple Comforts”
FAQs
Q: Can I store Mary Berry’s gingerbread in the freezer?
Yes, it can be frozen for up to three months. Just make sure it’s well wrapped to keep it fresh.
Q: How long will this gingerbread last?
It can keep fresh for up to a week if stored in an airtight container.
Q: Can I substitute powdered ginger for fresh ginger?
While fresh ginger has a distinct flavor, powdered ginger can be substituted in a pinch. To taste, adjust the amount.
Q: How can I make this gingerbread more holiday-themed?
For a festive touch, dust with powdered sugar or decorate with icing.
Q: What distinguishes Mary Berry’s gingerbread?
Mary’s recipe combines the ideal ratio of spices and sugars, resulting in gingerbread with unparalleled flavor and texture.
Related: Mary Berry Ginger Cake Recipe
Conclusion
As you savor each bite of Mary Berry’s Gingerbread, you’re not just enjoying a dessert; you’re experiencing the warmth of tradition and the joy of homemade baking. It’s a taste of comfort that’s hard to beat.
How Long to Cook Chicken on George Foreman Grill?
So you got yourself a George Foreman Grill and now you would learn to cook all your meals on it. I hear you. I was in the same place filled with excitement wanting to use my foreman grill not too long ago. Cooking chicken is probably the best decision to start with. So, how long to cook chicken on George Foreman Grill should not be that difficult to figure out. Let’s figure it out together.
Let’s remember the safe temperature for meat before consumption. It is 165 Degrees Fahrenheit. If you remember that and have a meat thermometer all kitchen gadgets are yours to conquer.
As a rule of thumb, I start out with a 4-5 minute grill on each side of the chicken breast on my George Foreman grill. Then I check and if needed let it cook some more.
Now, that is just what I have had the most success with. But getting to that point takes some prep work. Let’s talk a bit about that.
What is the Best Chicken Cut to Cook on the George Foreman Grill?

Hands down, the best chicken cut you can get for your George foreman grill is the chicken breast. Chicken breasts are a source of lean protein. Look for a chicken breast that has low fat and that way you are ensuring a healthy meal along with the flavor.
The other reason why I like cooking chicken breast on my George Foreman grill is because it cooks up nice and even. The heat cooks the meat thoroughly and it stays tender on the inside while it develops a brown crust on the outside.
It is flavorful, juicy and, in my opinion, very very versatile. You can find loads of recipes with chicken breast that go perfectly with a george foreman grill. You can also customise and make the recipes your own. Pairing a versatile choice of meat with a versatile kitchen gadget is really the golden ticket here.
How to Prepare the Chicken for George Foreman grill

The secret is in the marinade. For any kinds of grills really, I prefer to have a marinade that is low in sugar. This prevents the meat from sticking to the grill. It’s just personal preference though.
But grills can really dry out meat. The george foreman grill is better at keeping moisture than most other grills but it can still happen. So choose a marinade that keeps moisture.
I prefer just a regular olive oil marinade. Mix olive oil, salt, pepper, a bit of lime juice in a bowl and pour it over your chicken. This marinade is light and airy and lets the chicken really shine through. Once your meat is coated fully in the marinade, put it in an airtight box and stick it in the refrigerator for at least an hour. This will allow the moisture and the flavors to seep in.
The Cooking Process

Now, here is how I cook meat on my george foreman grill to have it ready in less than 5 minutes. You start with a pre-heated grill. Make sure your grill was preheated for about ten minutes.
Then in that grill put your marinated chicken breasts. Make sure to space them out a bit. Remember the chicken will lose some moisture and drip so it’s best to put the chicken on the bottom tray. Make sure everything is placed well, and close the lid and cook.
I usually let it cook for 4-5 minutes on one side and then flip it over to the other side. Then I let the other side cook for the same amount of time before checking.
On a cursory glance, you should not be able to see any pink meat. In fact the outer crust of the meat should be turning a golden brown by now. Take out your meat thermometer and check the temperature. If you see a 165 degree reading, you are good to go. If not, let it run for another 2-3 minutes.
Pro-Tip: Take the chicken out of the grill and let it rest for about ten minus before you serve it. This will lock in the moisture and flavor and your meal will taste oh so good!
Conclusion
That is my process with my george foreman grill that I follow. I have tried and tested other combinations but this is the one that I keep coming back to. It’s simple, it’s easy, and most of all it’s quick. If you follow these steps you should be able to figure out how long to cook chicken in the george foreman grill to fit your liking.
Again, everyone’s preferences are different. Play around until you find something that clicks. Have fun with your cooking!
How long to cook chicken sausage in the oven at 400?
Chicken sausages are the go-to meat option for many. And for good reason, it is easy to cook, flavorful, and rich in protein. And there are so many ways to cook it. Today, let’s talk about cooking chicken sausage in the oven.
How long you cook your chicken sausage in the oven at 400 degrees will vary depending on the kind of sausage you have available to you. Chicken sausages can take anywhere from 15 to 45 minutes to heat up and get cooked through.
But for an even distribution of heat, you must remember to turn it on each side at intervals.
This process is easy enough to follow that you will not feel any difficulty in your cooking. But let’s break it down a bit more for different kinds of chicken sausages and the different processes one can follow to cook them.
How long to cook chicken sausage in the oven at 400

There are mainly two different kinds of chicken sausages that require different cooking processes across all brands. And the secret is in how they are prepared. There are mostly pre-cooked and uncooked sausages. And they have their own benefits and drawbacks.
Pre-cooked sausages have different flavorings, even though they are easier to cook and consume. Raw links of sausages are harder to cook, they take a longer time to cook through, but you can really make the flavor your own by adding your own spices and herbs.
To really understand how long to cook chicken sausage in the oven, we need to focus on how much you want it charred. To stay safe, any meat that you cook needs to reach an internal temperature of 165 degrees. Always use a meat thermometer to make sure you are staying on the right track.
Why Cook Meat at 400 Degrees?
Like chicken breast or any other form of boneless lean protein, if you want to retain moisture and flavor, it is best to blast the piece of meat at a higher temperature and let it cook faster. On the contrary, if you were cooking the meat at a lower temperature and giving it more time to cook up, you could risk the sausage getting dry and rubbery.
The Cut Matters
Now, this is personal and will change depending on each person’s preference. If you are going for whole sausages, it will need to be left in the oven for longer. I would recommend slicing the sausages for a faster cooking time. This will give the link an easier time to cook through without getting dry.
But if you are going to keep the sausage links whole, you need to season it well. My personal favorite is a nice olive oil rub. Season it well with salt and pepper and let it rest in the fridge for a few hours. This will allow the flavor to seep through and taste better.
And then put it in your preheated oven. This is very important. Your microwave needs to be ready to go. And then cook it on each side for 15 minutes until it starts browning. Once it has browned enough for your liking, check it with a meat thermometer.
Now, if you are using sausage cut up into cubes, you can oil and season it and then put it in your oven. Smaller pieces will cook up easier, but they will definitely dry out faster too.
Pro-Tip: Cover your dish while cooking if it is cut up into smaller bits.
Okay, now that you have that sorted, let’s talk about the different types of sausages.
By now, you already know that raw link sausages will take longer to cook. But what about a quick-fix meal? Get the pre-cooked kind that you can find in most US grocery stores and get that to cook your quick meal. These pre-cooked sausages are an excellent addition to mac n cheese and quick pasta meals.
To prepare pre-cooked store-bought sausage, if it was frozen, let it come to room temperature and then pop it in the oven for about 15 minutes.
Safety Net: No matter what kind of sausage you are cooking and what process you’re using to cook it, always use a meat thermometer to make sure the sausage has reached the safe temperature before you serve it.
Also Read: Decoding the Shelf Life: How Long is Rotisserie Chicken Good For?
Bonus: The Best Dip Recipe
As someone who cooks chicken sausage all the time, I find that your recipes taste miles better with the perfect dipping sauce. Buffalo dipping sauce goes perfectly with baked sausages.
To make this dip, all you need to do is mix sour cream and buffalo wing sauce together. Depending on your liking, you can add more pepper to give it a little heat too.
Conclusion
And there you have it. These are all the ways in which you can cook chicken sausage in the oven at 400. Some might say you can just lower the temperature and cook it for longer just to be on the safe side, but i would recommend against it.
Simply because altering the temperature will alter the texture and flavor profile of your dish. If you are following the steps described in this article, you should really not be having any difficulties navigating the higher temperature. Happy Cooking!
How to Dehydrate Ground Beef?
Hikers, campers, climbers, and adventurers of all kinds have been dehydrating their food for ages. It is the easiest way to preserve the nutritional benefits and get a good source of protein when you are going to be away from easy supply.
But this is not just limited to hikers and climbers. In this economy, all households are finding better ways to buy bulk amounts of food and preserving them. So the question on how to dehydrate ground beef has become more relevant to us all that it was before.
And, honestly, it’s not that tricky. In our household, we have been dehydrating ground beef for a long time. To the point where it has become a regular everyday thing and no one even bats an eye. I personally think it is an important technique to learn and a very interesting habit to pass down.
So, let’s talk about it.
The Easy Answer to Dehydrating Ground Beef
You can dehydrate ground beef without much fuss and you can do it with ingredients and equipments that you already have at home. Having shelf-stable meat source will go a long way in terms of saving some cash and having a diverse pantry.
Ingredients and Equipments
- Lean ground beef
- Seasoning of choice (Optional)
- Skillet
- A Spatula
- Parchment Paper
- Paper Towels
- Colander
- Bowl
Process: How to Dehydrate Ground Beef

The trick is to get lean low-fat beef. The lower the fat content the better. Ask your butcher that you want to dehydrate this meat and so you need a lean cut. Once you have your lean ground beef, take it home, spread it out on a bit of parchment paper to soak up the moisture.
Now go ahead and heat up a skillet. Cook the beef until its well done. Do not add any extra fat to the ground beef. Once the beef is brown and no parts of it look uncooked, take it off the heat and put it in a colander to drain out any residual oil or fat.
Next lay the cooked ground beef on paper towels and allow for the fat to be soaked up by the paper towel. Take some more paper towel and squeeze out the excess oil. Squeeze out as much oil as you can. This will make the next few steps much easier.
Measure the weight of your ground beef. You will need this measurement later so write it down somewhere.
Now, you can either use an oven or a dehydrator, whichever is most comfortable and accessible for you. I will show you both directions.
The Dehydrator Method
Spread the ground beef onto dehydrating sheets and put them on heat. Here you can bump up the heat to get things going faster. Dehydrators are better in this case because your meat won’t burn.
The Oven Method
If you are using an oven you have to be a bit more alert. Take your cooked and drained ground beef and spread it onto some parchment paper on baking sheets. Stick the baking sheets into your in the oven on the lowest heat. And let it go on for about 3-5 hours. Keep a keen eye on the meat so that it doesn’t burn.
The Crumble Test
How do you know when your meat is done? Firstly, it’s going to gain a brown coloring and secondly it will be crumbly on touch. There won’t be any sign od moisture. Once it has reached that point your meat is pretty much done.
Now measure the weight of your ground beef again and subtract the number from the previous measurement. You will use these numbers when re-hydrating your meat before cooking next time.
Also Read: A Complete Guide On How To Tell If Bacon Is Cooked?
Is it safe to dehydrate meat?
Absolutely. It is a lot safer tha storing raw beef in the freezer. Because you are killing off the bacteria in the meat, there is little to no chance of any fungal infestation in the meat. It is shelf-stable and practical.
Quick tip
Some hikers add half a cup of bread crumbs to per pound of ground beef before cooking it in the skillet. This does not alter the flavor or the texture much but it adds a great benefit of quick rehydration. If you are going to take your deghydrated ground beef with you on a hike or an adventure this little trick can save you a whole lot of time.
This is also money efficient as it increases the volume of the meat.
Conclusion
Well, that’s about everything right off the top of my head. I believe you have everything you need to get going on your meet preservation journey. Share with a friend how you dehydrate your ground beef. It can be a fun little thing to share between family and something very interesting to teach your kids. Happy cooking!


